In this post, We are going to learn how to install flex builder 3 on windows. When we download Flex Builder 3 from Adobe, we find there are four versions currently available, two for windows and two for the Mac. For each operating system there are two versions, one known as standalone installer and other as a plug in installer.
We are going to demonstrate the use of the stand alone installer here. But if you’re already Eclipse user, you might instead use the plug in installer. Now in Flex Builder 2, there was only single installer executable and you make the selection of standalone versus plug in installation, During the installation process. In Flex Builder 3 there is actually two separate installers, and you want to make sure to start with the right one. Now how do you decide which one we want?
While, if you are developer who is already using the Eclipse for other purposes such as JAVA development, you might decide to use the plug in installer. So that you install Flex Builder 3 on top of the existing Eclipse installation. This allows you to keep all your existing plug ins and then simply lay Flex Builder 3 on top of the existing environment.
If your new to the Eclipse though, you probably better off using the stand alone installer, which include a copy of Eclipse. Even if you’re using the standalone installer though, it is important to know that you installing not for the Flex Builder Plug ins but also the complete copy of the Eclipse. And you free then to go other plug ins for other platforms. For instance, ColdFusion developers some times like to go CF Eclipse of free plug in for coldFusion application development. Even if the standalone installer, your still running the basic Eclipse workbench, that means you can go and get the additional plug ins and lay them in on top of Flex Builder installation.
So lets get started, We have downloaded the Flex Builder 3 windows installer and placed on desktop.
To get started, double click and start the installation process.
It takes few moments for the installer to unpack all of the files.

But once it’s done, we’ll be ready to do the installation. We can install the windows version of the Flex Builder3 on windows 2000/Xp/Vista.It is important to make sure we have enough memory. It is recommended minimum of 1GB of RAM on windows machine. And if we also running databases or other heavy duty memory potencive applications, The probably better off the 2 GB of RAM if we can get it.
When the installer finished the unpacking all files on harddisk, you first presented with the informational screen and asks what language we want to use for the installation.

We leave it to the default selection of English and click OK.
After few moments,We see the introduction screen.

Make sure we quit all the programs before we continue with the installation. In particular, we make sure close any browser windows such as Firefox ,or Internet Explorer. As part of this installation, we will be installing the ActiveX and Plug in versions of the Flash Player. And we need to make sure the browser windows are completely closed before we can continue with that process.
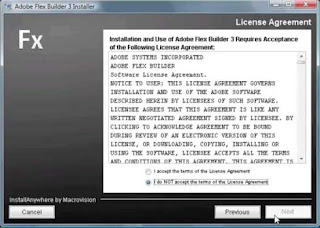
We click the next buttion, on the screen, if we accept the Terms of the license agreements. Click the “I accept“ button and click NEXT. And then indicates where we want to install Flex Builder3.

We always use the default settings of Program Files\ Adobe\Flex Builder 3. But we can put Flex 3 anywhere on disk.
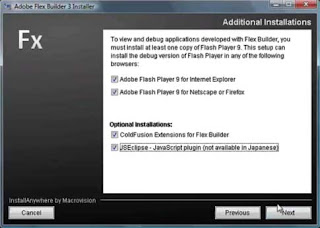
On the next screen, we’re asked what the additional soft ware tools to install. We always wanted to include the flash Player. The version of the Flash Player in going to be install this point is the debug Flash Player 9 and this version Flash Player is critical to debugging and otherwise testing our applications. There are also tools additional available called ColdFusion extensions for FlexBuilder. The ColdFusion extensions for FlexBuilder are valuable plug in that can be used for ColdFusion developers. The extension includes RDS capability, Remote Development Services. That allows you to connect ColdFusion servers and get data structure information and generate valuable code.The JSEclipse installation is for JavaScript developers. The JSEclipse plug in is a special use for developers to going to build AIR or desktop applications. And incorporating JavaScript based functionality. We don’t need either of these installations and infact if we don’t install this point it’s okay. Because you will be able to install them later on.
I am a ColdFusion Developers works FlexDevelopers, so I like to install ColdFusion extension for Flex Builder during the initial installation. I also some time do JavaScript application development and it doesn’t hurt have JSEclipse install, so I go ahead and select them as well and click Next.
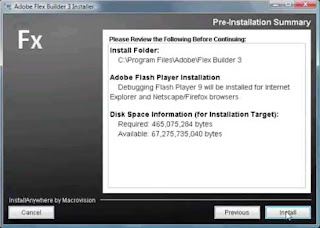
After few moments we see a summary of the installation selections, and then We click the Install button to complete the installation.

The installation takes a few minutes to run but once it is installed, we then able to start up flexbuilder 3 and start building applications. 
When the installation complete, we see the “Congratualations” message. Adobe Flex Builder 3 has been installed successfully and this point we are ready to get started with the applications.